Taking screenshots is not a particularly compelling computing task, but it is nonetheless a very useful skill. Screenshots can be helpful at work, necessary to keep a record, or have been requested by tech support to better describe the problem you are facing.
But if you’re taking screenshots on a Windows PC, the first thing to know is that you’re not stuck with just one way to do it – you’re not limited to just the print screen key.
How to take a screenshot on a Windows PC
Your options include sending your captured screenshot to One Drive, retrieving them via the Xbox game bar, and more. Our preferred method is to use the paint program, but you can edit the screenshots with any first- or third-party tool.
Further reading
- How to take a screenshot on a Chromebook
- How to take a screenshot on a Mac
- How to take a screenshot on an iPhone
Step 1: Capture the image
Windows provides six methods to capture your desktop as an image. Three are based on the Print Screen (PrtScn) key, while the remaining three require the Windows (Win) key.
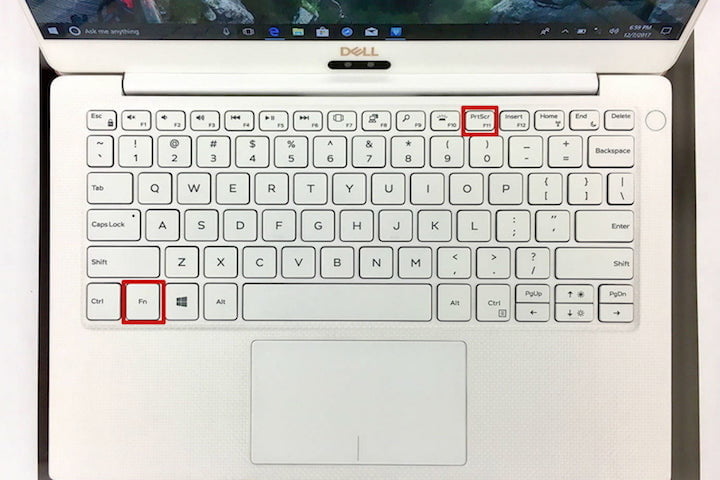
On external keyboards, you’ll find a dedicated PrtScn key located in the upper-right corner. The Win key typically resides on the lower left, between the Control (Ctrl) and Alternate (Alt) keys. It sports the Windows logo, so it’s hard to miss.
On laptops, the Print Screen command may be combined with another function on a single key, as shown above. In this case, you must press the Function (Fn) key in addition to the Print Screen key.
Here’s a breakdown of the six screen-capture commands:
Print Screen (PrtScn):Captures full screen. If you have more than one display, this function takes a picture of each item displayed on all connected displays. By default, this method does not save your image as a file, but only sends the captured image to the Windows clipboard.
How to take a screenshot on a Windows PC
Alt + Print Screen: Occupy a window. Be sure to highlight the target window, such as the document or browser, before pressing these two keys (or three on certain laptops). By default, this method does not save your image as a file, but simply sends the image in the capture window to the clipboard.
Win + Print Screen:Captures full screen. The difference is that Windows saves this image as a file. By default, it sends C: user <username> images> screenshots to your computer.
Win + Shift + S:Capture the screenshot using the built-in screenshot tool called Snap & Sketch. The screen dimms and provides four choices on a small toolbar (not including the exit icon): rectangular slip, freeform snap , Window snap, and full screen snap.
How to take a screenshot on a Windows PC
This device does not save the captions as a photo but simply sends them to the clipboard. We’ll expand on that later in the guide.
Win + G:Opens the Xbox game bar. Click the Capture button and then the Camera icon, and this tool will save an Image C: Users> (Username)> Videos> Captures by default.
Win + Alt + Print Screen:Occupies only the active window. This command saves an image in C: user> (username)> videos> already as captures..
In some cases, screenshots flicker or dimmer to indicate that Windows has captured the screenshot. If that doesn’t happen, open File Explorer and go to the corresponding default locations to see if Windows has saved your image.
If you’re using OneDrive, you can save screenshots in the cloud so they’re accessible from any device. However, it does not save screen shots by default. Instead, you’ll need to click on the standing cloud icon next to System Clock (or the Hidden Icons icon with the face icon at the top).
How to take a screenshot on a Windows PC
If this icon does not appear, you may need to first open the OneDrive app and sign in to your account. After clicking on the cloud icon, select Help and Settings and click Settings in the popup menu. Next, click the Backup tab in the resulting popup window and check the box below the screenshots. Then click OK.
In this case, press the first two commands of the print screen to automatically save the image file to OneDrive. You will not see the screen flicker or dim for these orders – instead you will receive a notification. If you want to access the images on your computer, make sure the Screenshots folder is in sync.
Step 2: Open Paint
If you used a method that saves your screenshot locally as a file, you can locate and view the image using the Photos app. If everything looks great, you can move it, attach it to an email, upload it to the cloud, and so on.
However, if you need to crop an image — especially those taken on PCs with more than one screen — you have three native tools at your disposal: Paint, Paint 3D, and Photos.
Compared to Paint and Paint 3D, Microsoft’s latest photo app is somewhat limited. You can rotate and crop images, change their aspect ratio, apply filters, adjust the color, remove the red eye. However, you can’t create an image from scratch and paste it from the clipboard.
In this guide, we use the old paint program because it is familiar and reliable. By default, you will not be listed in the Start menu. Instead, type “paint” in the search bar of the taskbar and click on the resulting desktop app.
Paint may also be available when you right-click on an image. When the popup menu appears, hover your mouse pointer over the open menu option of the menu to see the paint listed in the secondary menu shown below.
Alternatively, you can search the program: mspaint.exe – C: Windows> System32 directory. Right-click the file and select the PIN to start on the popup menu.
Step 3: Paste the screenshot (clipboard only)
You will need this step if you used a screenshot method that sends your capture to the clipboard.
With Paint open, click the Clipboard Style Paste button in the top left corner. You can also press the Ctrl + V keys on your keyboard to paste the icon on a blank paint canvas, which expands accordingly.
By inserting your screenshot correctly in Paint, you can crop, paint, create shapes, add text and much more. If you want to add stickers, 3D shapes, effects, and more, click the Paint 3D button with the color correction at the right end of the toolbar.
Step 4: Save the screenshot
When you have finished editing the image in Paint, click on the main file option in the upper left corner. Next, select Save as in the drop-down menu. This option expands with four file formats – PNG, JPEG, BMP, and GIF – along with other formats options, allowing you to upload your image to TIFF or HIC. Save as file.
If you are unfamiliar with image formats, check out our guide JPEG vs. PNG: When and Why to Use One Format to Another.
Whatever format you choose, a popup window appears. Enter a file name, and select the file format you want from the drop-down menu. You can still choose a specific destination if you don’t want to save your screenshot to the default location.
When you’re ready, click the Save button in the bottom right corner.
And that’s it! You have done
Alternative: The Snipping Tool
The best alternative is the snapping tool. This built-in utility for screen capture works much better, but it’s not the strongest or most versatile when it comes to saving a snapshot. However, it is a utility that allows users to better define and capture certain parts of their desktop display as screenshots.
To get started, just type “Collision Tool” in the search bar of the taskbar and select the resulting app. Once it opens, you’ll receive a notification that it is “moving to a new home” in a later update. It’s still a tool available, but Microsoft encourages you to use Snap and Sketch or the aforementioned One + Shift + S keyboard shortcut.
As the snapping tool opens, click the Mode button to expand its menu. You will have four screen capture options: Draw window (free form snap), capture an area (rectangular snap) box, capture the current window (window snap), and capture the full screen (full screen snap) ۔
How to take a screenshot on a Windows PC
Note that the screen turns white if you use the free form and rectangle snap methods. Once you start defining the location of the screenshot, the white color clears within that area. If you are capturing a specific window (Window Snap), your screen is on a white indicator in addition to the contents of the selected window.
The snapping tool also includes a delay feature. It can wait between one and five seconds before taking a great screenshot, so you can capture a video or animation at a single moment.
Once you capture the screenshot, the snapping tool interface expands to display your screenshot. You can make light edits using pens, highlighters and erasers. You can also click the Color Paint 3D button to make additional edits to the new application.
When you have edited the snapping tool, click the file in the upper left corner, and then click the Save option as listed in the drop-down menu.
Alternative: Snip & Sketch
Snap & Sketch is a new version of Microsoft’s high-speed utility. You can access this tool from the Start menu or by typing One + Shift + S on your keyboard.
If you use a keyboard shortcut, the screen darkens and the top five buttons present the toolbar. Your old snapping tool has the same functions, but it doesn’t save your screenshots as a file. Instead, the image goes straight to your clipboard first.
You’ll also see a desktop notification that notifies you that the image has been copied to the clipboard. This same notification gives you the option to edit the image in the Snap & Outline app. You can access this latter option by clicking on the desktop notification yourself.
If you click on the notification, the screenshot fills up inside the app, allowing you to trim the image and apply a pen, pencil, highlighter and eraser.
If you upload the Snap & Sketch app instead, click the drop-down arrow next to the new button in the top left corner and select Snap Now in the drop-down menu. The screen turns black, and a five-button toolbar appears. Take your Snap, and the image you want is automatically loaded into the Snap & Sketch app, which is ready for you to edit.
When you’re ready, save this image by clicking the Disk Style button anywhere on your PC. If you want to edit and save the screenshot using any installed image editor, click on the 3 dot icon on the toolbar and select the Open with One option in the drop-down menu.
Third-party alternatives
If you want even more options for selecting and customizing your screenshots (and don’t mind downloading a new app), we recommend trying LightShot once. It’s free and works on Windows and Mac OS. Light shots may be a better option for more professional work or screen shots that require significant editing.
We also recommend the GNU Image Manipulation Program (GIMP). It’s an open source tool for creative creators who don’t want to pay for Adobe Photoshop. It requires you to create artwork, edit high definition images, and more.
How to take a screenshot on a Windows PC