Need to save what you see on your phone or computer screen? Mobile and desktop operating systems offer strong screen capture tools.
Most are included in the tool, but there are third-party options to work with, as well as browser extensions. Here’s how to take a screenshot on Android, Chrome OS, iOS / iPadOS, Linux, macOS, and Windows.
How to Take a Screenshot on iPhone or iPad
If you have an Apple device that still has the Home button (such as the 2020 iPhone SE), press the Sleep / Wake button and the Home button to take a screenshot.
You’ll hear the camera shutter (if your voice is on) and see “Flash” on the screen. The screenshot will then appear in your Camera Roll and Screenshots album.
For devices without the Home button, for the iPhone X, 11, and 12 lines, and the latest iPad Pro and iPad Air devices – the button on the right side of the screen (the top button on an iPad) and the volume up button on the bottom. Hold on. straight away
If you use an Apple Pencil with the iPad OS, you can use the drawing tool to capture the screen. Swipe down the bottom corner with an Apple pencil to capture the image. You can also choose between your current screen or the entire page after taking a picture.
To interpret a screenshot, tap the thumbnail that appears at the bottom of the screen once you’ve captured the image. This will open the tool’s markup tool and allow you to edit the screen grab.
Some apps may make it difficult to take screenshots from modest sources. This is where your device’s internal screen recording tool comes in. While its main purpose is to record a video of your screen, you can pause the video and take a screenshot like this.
You can also use a third party tool to capture the screen on your mobile device from the computer. With Lonely Screen, you share your screen via AirPlay and record or capture anything on your mobile device screen from a computer.
As long as the PC and mobile device are on the same Wi-Fi network, Aporsoft’s iPhone / iPad Recorder can work. Turn on the AirPlay connection in the Control Center, then record the video to the computer and record.
How to Take a Screenshot on Android
Android devices are not the same as the iPhone and iPad, so screenshot commands may vary depending on the manufacturer of the phone.
Most Android devices should be able to take screen gibs by holding down the power and volume down buttons, although they can also work by holding down the power and home buttons (if your device has a physical button).
The screenshot button in the pull-down quick settings menu is available on many Android devices. If your phone has Google Assistant or Bexby (Samsung), ask the voice assistant to take a screenshot for you.
For Samsung devices with S-Pen styles, get a screen capture from the Air Air Command menu by tapping Screen, Write Screen, and then type or crop the image.
Samsung phones also support gestures for taking screen shots. Go to the screen icon of your choice, apply your hand as if you intend to cut the phone karate, then swipe the whole part of your hand from right to left with the screen. Adjust (or turn it off) to swipe on Settings> Advanced Features> Palm.
No matter what device you have, all Android users can download third party apps to capture the screen. Many apps can also take screenshots to record video. Screenshot Easy is a top rated option that uses the same basic triggers as Android. You can take a screenshot by just shaking your phone.
To take screenshots of what’s happening on your Android device on a computer, check out Aporsoft’s Android Recorder. The app lets you cast your phone or tablet screen into a Windows or MacOS machine to easily retrieve your photos and videos. It requires Android 5.0 and above.
How to Take a Screenshot on Apple Watch
Did you know that you can take a screenshot of your Apple Watch? First, the feature must be enabled. Open the Watch app on your iPhone, and enable My Watch> General> Screenshots and toggle on it.
Take a screenshot on an Apple Watch by dragging the screen you want to capture. Hold down the side button and click on the digital crown at the same time.
Like the iPhone, the screen will be “bright” white and the camera shutter will be closed. The screenshot will then appear on your phone’s camera roll, not the watch itself.
How to Take a Screenshot on Wear OS
If you have a smartwatch made by Fossil, Huawei, Motorola, or Samsung, it runs on Google’s wearable OS. Taking screenshots on your Wear OS device is now easier than ever because you use an app on your phone to work.
Open the Wear OS app, tap the 3dot menu and select Screenshot Watch. You will receive a notification on your phone that will allow you to save or share the image with the help of apps.
How to Take a Screenshot in Windows 10
The easiest way to take a screenshot in Windows is to use the print screen button. You will find most of the keyboards in the upper right. Tap it once and it looks like nothing happened, but Windows has just copied a full screen image of you to the clipboard. You can then paste Ctrl + V into the Paint, Word, or Image Editing program.
The problem with this method is that it captures everything that appears on your monitor, and if you have a multi-monitor setup, it will capture all the displays, such as This is a big screen. Narrow things down with the ALT + print screen, which will only capture your open window.
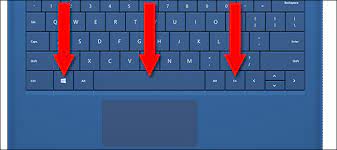
Windows also offers Snap & Sketch, which was introduced with the Windows 10 May 2019 update. Open the program using the Shift + Windows + S keyboard shortcut, which will launch a small toolbar at the top of the screen so you can easily choose what grip it is. (Or type “snap and sketch” in the search bar.)
Snap & Outline is similar to Microsoft’s snapping tool, which is still available but now includes a warning about “moving to a new home” in future Windows updates, and people There is also a suggestion to try Snap & Sketch instead.
Another built-in option for screen capture is the Windows game bar. Although intended to record gaming sessions, it can be used to record any action and capture screen capture. Open the Windows + G tool, and tap the Camera button in the Capture section to save a screenshot in the Video / Captures folder under your main User folder.
If all else fails, get the third-party screen capture utility available in Windows. The best option is Snagate, which costs wh50. Of course, it will do everything you can imagine, even taking videos of what’s happening on your screen.
Although you can find many screenshot apps for free. TechSmith Capture, through Snigate’s creators, also makes screencast videos and makes it easy to share what you capture. LightShot is a nifty and small utility that handles the key to the screen and makes it easy to capture and share.
How to Take a Screenshot on Mac
With the release of Macus Mojawi, Mac users gained more control over capturing screen shots. The update introduces a screenshot tool that can be triggered by pressing Command + Shift + 5 or navigating to LaunchPad> Other> Screenshot.
The screen capture window allows you to perform various tasks and save photos to your desktop. Choose to capture the entire screen, part of the screen, or a particular window. You can capture a full-screen video or just a portion of it, and have the option to take a screenshot on the timer and change it where the images are saved.
For everyone who prefers keyboard shortcuts, they’re still supportive. Use Command + Shift + 3 to capture the full screen. If you only want part of the resulting screen, the command + shift + 4 will change the cursor to a cursor. Select the section of the screen you want to capture.
To capture a specific window, use the command + Shift + 5 (yes, the same shortcut to activate the screenshot tool). Then press the space bar to switch between capturing a portion of the screen and a specific window. If you have a Mac with a touch bar, grab it by pressing Command + Shift + 6.
You can capture an image using any keyboard shortcut, control it, and save it to the clipboard. For example, use the command + shift + control + 3 to capture the entire screen or the command + shift + control + 4 for a specific part. The image will not be saved on the computer, but can be pasted into an app.
How to Take a Screenshot on Linux
There are almost as many ways to take screenshots in Linux as there are Linux flavors. Focusing specifically on Ubuntu, open the Activities menu and select the screenshot. You can then choose between a full screen, a window or a custom area before hitting an image.
Linux allows you to use the Alt + Print screenshot as well as the Print screen button for a screenshot of a specific window. Use Shift + Print screen to select custom area to capture. You can also add a Ctrl key to any shortcut and save the image to the clipboard.
The program GIMP (GNU Image Harassment Program) allows you to take a screenshot from the same program where you edit the image after capturing it. Open GP and go to File> Acquisition> Screenshot. You will have some options, such as taking full screen, window or using time delay. The captured image then opens in GIMP for editing.
How to Take a Screenshot on a Chromebook
If you have a Chromebook, you can take a screenshot with the laptop’s window switch. This button is located at the top of the keyboard and has a picture of the box next to it. Press Ctrl + Window Switch key to take a full screen snapshot. You will be notified at the bottom right of the screen.
Use the keyboard combination Ctrl + Shift + Window Switcher to get only one part of the screen. The cursor becomes a cross hairs that you can use to select the ones you want to capture.
If you’re using a standard keyboard – not a Chromebook keyboard – you won’t see the window switcher button. You will need to use Ctrl + F5 and Ctrl + Shift + F5 instead. When you use your Chromebook in tablet mode, you can take screenshots without using the keyboard. Press the power and volume down buttons to take a picture, although this method can only be used to capture the entire screen.
All images are saved as PNG files in the computer’s native downloads folder. If you want to save these screenshots permanently, you’ll need to upload them to Google Photos or back them up to Google Drive.
Since 90% of what you do on a Chromebook is probably in the Chrome web browser, you can also use several Chrome extensions.
How to Take a Screenshot in a Web Browser
Supports support extensions for Chrome, Firefox, Safari, and Edge browser. Here are some programs you can download that include a browser extension. Use these aids to add screen capture utility to the browser.
LightShot It’s free and works on Windows and Mac, but can also be added as a Chrome and Firefox extension.
FireShot Is a paid (. 59.95, but currently. 39.95) capture program that works with a browser or email client. You can capture, edit, share via social media, and save files to your computer. There are also Chrome, Firefox, and Edge extensions.
Awesome Screenshot Is a free program that captures an entire page or a section, and then immediately describes it (or blurs the naughty bits) before sharing it. There are extensions for Chrome, Firefox, and Edge.
Nimbus Screen Screenshot Is free and allows you to capture the entire screen or part of it. You can also use it to draw, interpret, or mark the same images. Chrome and Firefox extensions.
Page Screenshot Safari is a paid (99 2.99) extension for users that can cover the entire length of a website or just a specific section. Once the screen is captured, the program opens the preview for easy editing